How to Calibrate and Set Up your Monitors
Good monitoring and monitor calibration is without a doubt one of the most important aspects of Audio engineering and for any audio engineering course, be it recording or Mixing or even Mastering. The lack of decent monitoring can make your life as an engineer hell. In this blog post we will talk about a few ways that we can set up and tune monitors in any given room so that we can get the best possible response out of those monitors in combination with the room.
There is nothing better than to get a room treated acoustically by a seasoned professional
Step no. 1
Why do we need good Monitoring?
Although I’ve answered this question in previous blog posts, in this one I will try to break down the importance of good monitoring not just for mixing, but also for Recording and Producing.
Lack of good monitoring can cause serious flaws in setups building up to a record, which most of the time end up being unfixable and lead to extremely shoddy results. Let me give you an example of this one particular session that I have been working on recently. Due to the COVID 19 crisis, I’ve unfortunately found myself working on a lot of recordings which have been recorded at home with subpar monitoring. So in this specific session, the biggest issue we faced was with the Bass that was recorded, it had an extremely dynamic range by which I mean, some notes on the bass were extremely loud and some were very soft. This led to some issues with trying to get the bass and the kick drum to sit together.
Now, how does this relate to monitoring you may ask? I’ve personally recorded this musician before and never faced this issue, what happened in this specific recording is that the musician that was recording in the room with those monitors was probably unable to hear some of the notes due to them canceling out because of the room modes or bad speaker placement and was hence playing louder than he usual would. This led to a recording where it sounded fine in that specific environment, but when heard on any other system with a relatively flat response, the flaws were apparent.
Step no. 2
Can good speaker placement do away with the need of Acoustic Treatment?
Ofcourse, there is no better way than to get a room treated acoustically and monitor calibration done by a seasoned professional, but in some cases you can get a decent sound out of the speakers by just placing them in the right spot in the room.
Step no. 3
Room EQ Wizard:
In order to perform the test you would need to access this freeware called REW. It’s a tool that measures the frequency response of your speakers and gives you some detailed feedback on what is going on with the speaker placement. This tool requires basic understanding of Input and Output Routing of your Audio Interface, a calibration Microphone and of course a pair of monitors.
- Start by identifying the way in which you want to orient the monitors, usually the rule is that the speakers should always be along the length of the room, i,e the longer the distance between the speakers and the backwall the better.
- Ensure that both speakers are at the same level and have no “Room Correction EQ applied to them”.
- Start by placing them in a way that the sweet spot is roughly at ⅜ the length of the room. The way sound works in a closed room is that you will have a null point around half the length of the room, halfway between the centre and the side walls and halfway between the ceiling and the floor. These null and resonant points are the ones to avoid at all costs.
- Now we of course cant see these, but which is why we are going to use a tool like REW to measure the response of the monitors and make slight adjustments to them in a way that we end up with a better setup.
- Once you have figured out the position of the sweet spot, start by identifying how far apart and away from the sweet spot the Monitors should be placed. Ideally speaking we want to create an “Equilateral Triangle” with the speakers, which means the distance between the two speakers should be the same as the distance between your ears and any one speaker.
A simple way of doing this is by taking a measure tape and placing the speakers apart from each other so that they are at an equal and appropriate distance away from the side walls (Its gets a little complex here and we will expound on this later) and ensure that the distance between the speakers and the ears is the same.
- Once the monitors are placed in this position, keep the microphone at the sweet spot and take a measurement of the Frequency response using REW.
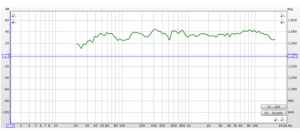
This will give you a result that might look something like this:

As we can clearly see in the above FR that there is a null in the speakers around 80hz to 120hz as well as 550hz
- Now comes the time to experiment and move the speakers around in a way that you try to flatten this graph as much as possible, note that it is impossible to completely flatten this graph.
- Mark the first position on the floor and keep moving the speakers around a few inches closer to each other and a few inches forward and backward and look for improvements in the test results.
- Once you find yourself in a better spot, then tweak the speakers so that you get the right image, i,e the vocals sound in the center of your reference track and that the overall image sounds more put together.


